Monday, January 31, 2011

Inbox Repair tool

If you can't open your Personal Folders file (.pst) or your Offline Folder file (.ost), or you suspect that your .pst or .ost data file is corrupted, you can use the Inbox Repair tool (Scanpst.exe) to diagnose and repair errors in the file. The Inbox Repair tool scans only the .pst or .ost file, not your mailbox on the server running Microsoft Exchange. The tool determines whether the file structure is intact. If it is not intact, the Inbox Repair tool resets your file structure and rebuilds the headers.

The Inbox Repair tool works on both the Microsoft Outlook 97-2002 Personal Folders File (.pst) and the Office Outlook Personal Folders File (.pst) data files in Microsoft Office Outlook 2003 and Microsoft Office Outlook 2007.

Scanpst.exe

Scanpst.exe is a free utility from Microsoft designed to repair corrupt or damaged Outlook PST files. You can look for a free scanpst.exe download, but that isn’t very safe as you never know what kind of file you might be getting from the Internet. And it isn’t necessary. Every version of Outlook, including XP, 2000, 2003, 2007, etc. (even the latest Microsoft Outlook 2010) includes a copy of the “Inbox Repair Tool”, which is the name for the scanpst.exe software program.

The problem is that the Microsoft Office/Outlook installer places the repair program in hard-to-find locations and makes it a hidden file. So make sure you search all your system files and you should be able to find it (more details on this below).
Scanpst.exe Errors

Saturday, October 25, 2008

Setup Outlook 2007 - POP3 - IMAP - Gmail

To set up your Outlook 2007 client to work with Gmail:

  1. Open Outlook.
  2. For new setups, select Do not upgrade.
  3. Click Yes.
  4. Enter your display name, email address (including '@gmail.com'), and password. Google Apps users, enter your full email address, e.g. 'username@your_domain.com.'
  5. Select the 'Manually configure server settings or additional server types' checkbox.
  6. Select Internet E-mail.
  7. Settings: name, full email address (including '@gmail.com' or '@your_domain.com')

    * In the Account Type dropdown menu, select IMAP; enter the incoming and outgoing server names shown below.
    * In the 'User Name' field, give your full Gmail address, including '@gmail.com' or '@your_domain.com.'
    * After creating these settings, clicking Next takes you to the end of the setup.
  8. In the Tools menu, select Options then Mail Setup. Under 'Email Accounts,' click E-mail Accounts.
  9. Select an account, and click Change above the list of accounts. Click More Settings, then the Advanced tab.

    * Incoming server must be 993, and must use SSL encryption.
    * Outgoing server can use 587, TLS encryption.
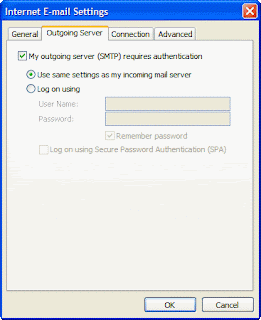
  10. Click the Outgoing Server tab. Make sure that 'My outgoing server (SMTP) requires authentication' is selected. The radio button 'Use same settings as my incoming mail server' should also be selected
    .
  11. Click OK > Next > Finish > Close > OK.

Friday, October 17, 2008

Setup Outlook 2003 - POP3 - IMAP - Gmail

To set up your Outlook 2003 client to work with Gmail:

1. Enable IMAP in Gmail. Don't forget to click Save Changes when you're done.
2. Open Outlook.
3. Click the Tools menu, and select E-mail Accounts...
4. Click Add a new e-mail account, then click Next.
5. Choose IMAP as your server type by clicking the radio button, and click Next.
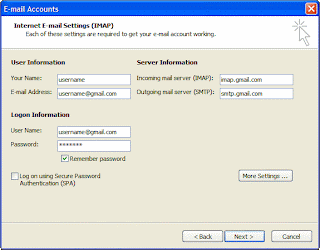
6. Fill in all necessary fields to include the following information:

User Information
  • Your Name: Enter your name as you would like it to appear in the From: field of outgoing messages.
  • Email Address: Enter your full email address (username@gmail.com). Google Apps users, enter your address in the format username@your_domain.com
Server Information
  • Incoming mail server (IMAP): imap.gmail.com
  • Outgoing mail server (SMTP): smtp.gmail.com
Login Information
  • User Name: Enter your full email address (including @gmail.com or @your_domain.com)
  • Password: Enter your Gmail password.
7. Click More Settings... and then click the Outgoing Server tab.
8. Check the box next to 'My outgoing server (SMTP) requires authentication' and select Use same settings as my incoming mail server.
9. Click the Advanced tab, and check the box next to 'This server requires an encrypted connection (SSL)' under Incoming Server (IMAP).
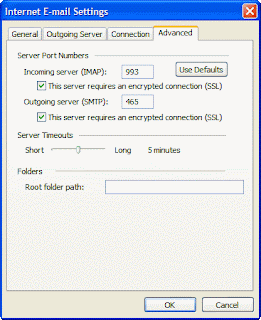
10. Check the box next to 'This server requires an encrypted connection (SSL)' under Outgoing Server (SMTP), and enter 465 in the Outgoing server (SMTP) box.
11. Click OK.
12. Click Test Account Settings... After receiving the message 'Congratulations! All tests completed successfully', click Close.
13. Click Next, and then click Finish.

Wednesday, May 28, 2008

Microsoft Outlook Express - POP3 - IMAP - Gmail

To set up your Outlook Express client to work with Gmail:
  1. Enable IMAP in Gmail. Don't forget to click Save Changes when you're done.
  2. Open Outlook Express.
  3. Click the Tools menu, and select Accounts.
  4. Click Add, and then click Mail.
  5. Enter your name in the 'Display name' field, and click Next.
  6. Enter your full email address (username@gmail.com) in the 'Email address' field, and click Next. If you are a Google Apps user, enter your full address in the format 'username@your_domain.com.'
  7. For 'My incoming mail server is a ______ server', please select IMAP in the drop-down menu.
  8. Enter 'imap.gmail.com' in the 'Incoming mail (POP3, IMAP or HTTP) server' field. Enter 'smtp.gmail.com' in the 'Outgoing mail (SMTP) server' field.
  9. Click Next.
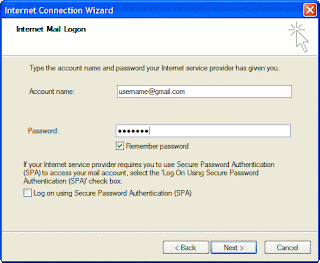
  10. Enter your full email address (including '@gmail.com' or '@your_domain.com') in the 'Account name' field. Enter your password in the 'Password' field, and click Next.

11. Click Finish.
12. Highlight imap.gmail.com under Account, and click Properties.
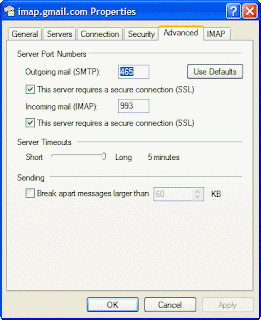
13. Click the Advanced tab.
14. Under Outgoing Mail (SMTP), check the box next to 'This server requires a secure connection (SSL).'
15. Enter '465' in the 'Outgoing mail (SMTP)' field.


16. Under Incoming mail (IMAP), check the box next to 'This server requires a secure connection (SSL)'. The port will change to '993'.
17. Click the Servers tab, and check the box next to 'My server requires authentication.'
18. Click OK.